How can I change the point at which USB 3.0 Vision frames are timestamped?
By default, the system time will be used as the time reference for the timestamp applied to each recorded video frame. The timestamp is applied immediately when the frame header is received by the software. This means the applied timestamp is relative to the start of the frame transfer. In multi-camera configurations, timestamping frames relative to the start of exposure is often preferred over timestamping relative to the start of frame transfer, especially if the cameras have widely-varying exposure times.
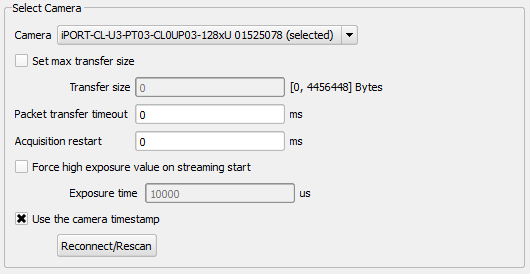
Most USB 3.0 Vision cameras provide timestamps in the header of each image. These timestamps are generated by the camera as the frame is exposed and are usually relative to the start of the exposure period. To timestamp frames based on this camera timestamp instead of the start of frame transfer, check the "Use camera timestamp" setting on the camera's "Connect" tab.
Note: The camera's internal timestamp clock is synchronized with the system time (or another reference) at the start of acquisition. As the recording progresses over a long period of time, this internal time will drift relative to the reference time. Even two identical cameras will drift relative to each other due to variances in their internal time counters. The result is that the timestamps near the end of a long recording can be noticeably different than the reference time.
Timestamping frames relative to the start of frame transfer is the default and recommended setting as it uses a common time reference, avoiding the potential for timestamp drift between multiple cameras.
Related Articles
My GigE Vision camera status shows it as disconnected
Open the “Connect” tab of the camera and check “Enable” in the “Force IP” box. Specify an IP address that uses the same subnet as the IP address of your connected network. The IP address of the connected network will be shown in the ...How do I switch my camera to USB3 Vision Mode? (Ximea)
Some cameras have the capability to run in different connection modes. If a camera is plugged in to a USB 3.0 port but is in GigE Vision mode, the camera will not be detected properly. Consult your camera's manual on how to switch your camera to USB3 ...How to Check if Camera Data Rate is too High Using Storage Manager
This article will help verify if the data rate of the attached cameras is too high for the VidIO module drive set installed in your DVR Express CORE 2 recorder. Before starting make sure your DVR is set up properly, the attached cameras are ...CameraLink Communication with DVR Express Core
CameraLink Registry Path For Serial Communication From the start menu launch "regedit" to edit registry entries. Go to HKEY_LOCAL_MACHINE > SOFTWARE > cameralink and look at the CLSERIALPATH variable. Programs should search for the clserio3.dll in ...Is it Possible to Use Consumer SSD Drives on a Core and Core 2?
DVR Express Core 2 Consumer SSDs will not be recognized by Core 2 devices. VidIO Drive Modules are the only storage media that will function with a DVR Express Core 2 device. These must be purchased from IO Industries. DVR Express Core Supports ...